
"How do you grow morel mushrooms?"
There are several planting methods for morel spawn that have successfully produced morel mushrooms. With morels, the planting technique is the key to success.
Morel mushroom cultivation is done commercially in the United States, in China, and in Israel. By far, the most reported success has come from Chinese growers. The most commonly cultivated species in China is morchella importuna, and the most commonly cultivated species in the USA appears to be morchella rufobrunnea. I offer both types of morel species in the kits that I produce.
M. rufubrunnea is native to areas west of the Rocky mountains in the USA, and M. importuna is native to areas to the east. These species are typically selected for cultivation due to the fact that they do not require a mature association with a nearby host tree in order to produce mushrooms.
Morels behave differently than many species of mushroom. In particular, morel fungus requires a colonized wood layer underground, with a moist surface layer on top, protected from drying winds and sun.
Let's review some of the ways in which a morel grow kit can be planted. The first two methods presented are the simplest. Each method provides certain advantages, and at the bottom of this post, I'll summarize the benefits of each method.
The Simplest Method of All - Just Bury a Morel Grow Kit
My morel mushroom grow kit is a big 8.5 lb block of sterilized hardwood and grains, that has been inoculated with morel fungus. It is ready for use approximately 45 days after it is created. Once the morel mushroom kit has been covered in white fungus, it is ready for planting.
The simplest way to plant it is to just plant the colonized morel mushroom kit itself. Start by lifting away the topsoil layer using a shovel or spade, with any vegetation attached. Dig a hole deep enough to place the morel kit at the bottom, with the top of the morel kit no higher than 3 inches below the top layer of soil. Fill the hole back up with soil and place your topsoil layer back on top. then, keep the area moist (not flooded). Once the morel fungus begins to run out of nutrients in the substrate of the morel grow kit, it will switch to survival mode and began attempting to produce morel mushrooms in order to escape the area in the form of spores.
Still Pretty Simple - Using Morel Spore Slurry
If you have a lot of hardwood or fruit trees on your property, with abundant natural wood content present in your soil (or added in artificially), you might try this method instead of preparing a morel bed. The morel slurry method is easy and fun. How fun? Check these kids out. :)
In this video, the Urban Farming Guys start from a blended-up fresh morel mushroom in water, to get their morel spores and bits of mycelium. They've added 2 tablespoons of molasses and a tablespoon of salt and brewed their slurry for around 48 hours, with air bubbled into the bucket via an aquarium airstone, to allow for spore germination. It's a simple method with good results - but for their method, you have to start with a fresh morel mushroom to blend up.
If you don't have a fresh morel mushroom on hand, you can easily use one of my colonized morel kits to follow this procedure, with a lot less effort and time. Using a morel kit to start your spore slurry will actually increase your chances of success, due to the vast amount of morel mycelium that ends up in the slurry you create. Any time you increase the amount of mycelial mass used in your spawn material, you've increased your chances of success.
Simple Method for Making Morel Slurry from a Morel Grow Kit
Simply take a big chunk of your fully colonized morel grow kit, place it in a bucket of cold tap water, and mash/mix the solid block into the cold water. You can even mash it up by hand, if you wish.
Starting a morel slurry with a big, fully-colonized mushroom kit gives you the advantage of starting with a HUGE mass of morel mycelium, and includes a colonized food source as well - which will improve your chances of the morel "taking hold" in your garden. An 8.5 lb morel mushroom grow kit, divided evenly with a clean knife, could be used to produce 30 gallons of morel slurry with a 5 gallon bucket. You could inoculate by hand a pretty good-sized area with 30 gallons of spore slurry.
Don't put your spore slurry through a sprinkler system, due to the possibility of clogging the sprinkler heads with little chunks of substrate and mycelium. Use the morel spore slurry immediately after assembling it - there is no need for the morel to further colonize the slurry, since it has thoroughly colonized the substrate already. All the little bits of grain and sawdust are the morel's food source already, and everything is poured out onto your garden.
The best time to inoculate your area with a morel spore slurry is right after a rain, or even during a rainfall. A sprinkler can be used to achieve the same effect. It is important that the area does not completely dry out at any point, but especially during the first week after you've tossed out your spore slurry.
This method only requires a few fresh morel mushrooms to get started. Just reach into a big bag of fresh morel mushrooms, grab a big handful, and throw them in the blender with some water for 3 seconds.
Morels are currently sold at around $50-60 per pound. They can be tricky to find. Might even cost you a whole day and a few miles, looking for them. Go on, toss them in and hit the blend button. It might be harder than you think, to hit that blend button and liquefy your prized morels, thereby rendering them undelicious.
I make morel mushroom kits, pick up one today and use it to make your slurry instead. They're currently $49.95 with free shipping to anywhere in the lower 48 states. With a morel mushroom kit, you'll get 8.5 lbs of substrate that will become almost totally consumed by the morel fungus over time.
It's actually more effective to take a morel kit and turn it into morel slurry, than it is to use a fresh morel mushroom. This is true for several reasons. For starters, you'll get more morel mycelium mass to start with. Second, it comes with the morel's food (substrate) attached to the morel fungus, which helps it get started in your garden. Third, you can turn it into slurry immediately after it is fully colonized, and there is no need to bubble air through it for 2 days - just mash it into water to create a slurry, no other ingredients or treatment required. I recommend mixing it into single 5-gallon bucket, then distributing the contents into 5 other buckets - creating 30 gallons of liquid morel slurry.
The Layered Bed Method
This method is published in Organic Mushroom Farming and Mycoremediation by Tradd Cotter - an excellent read for anyone looking to get into this hobby.
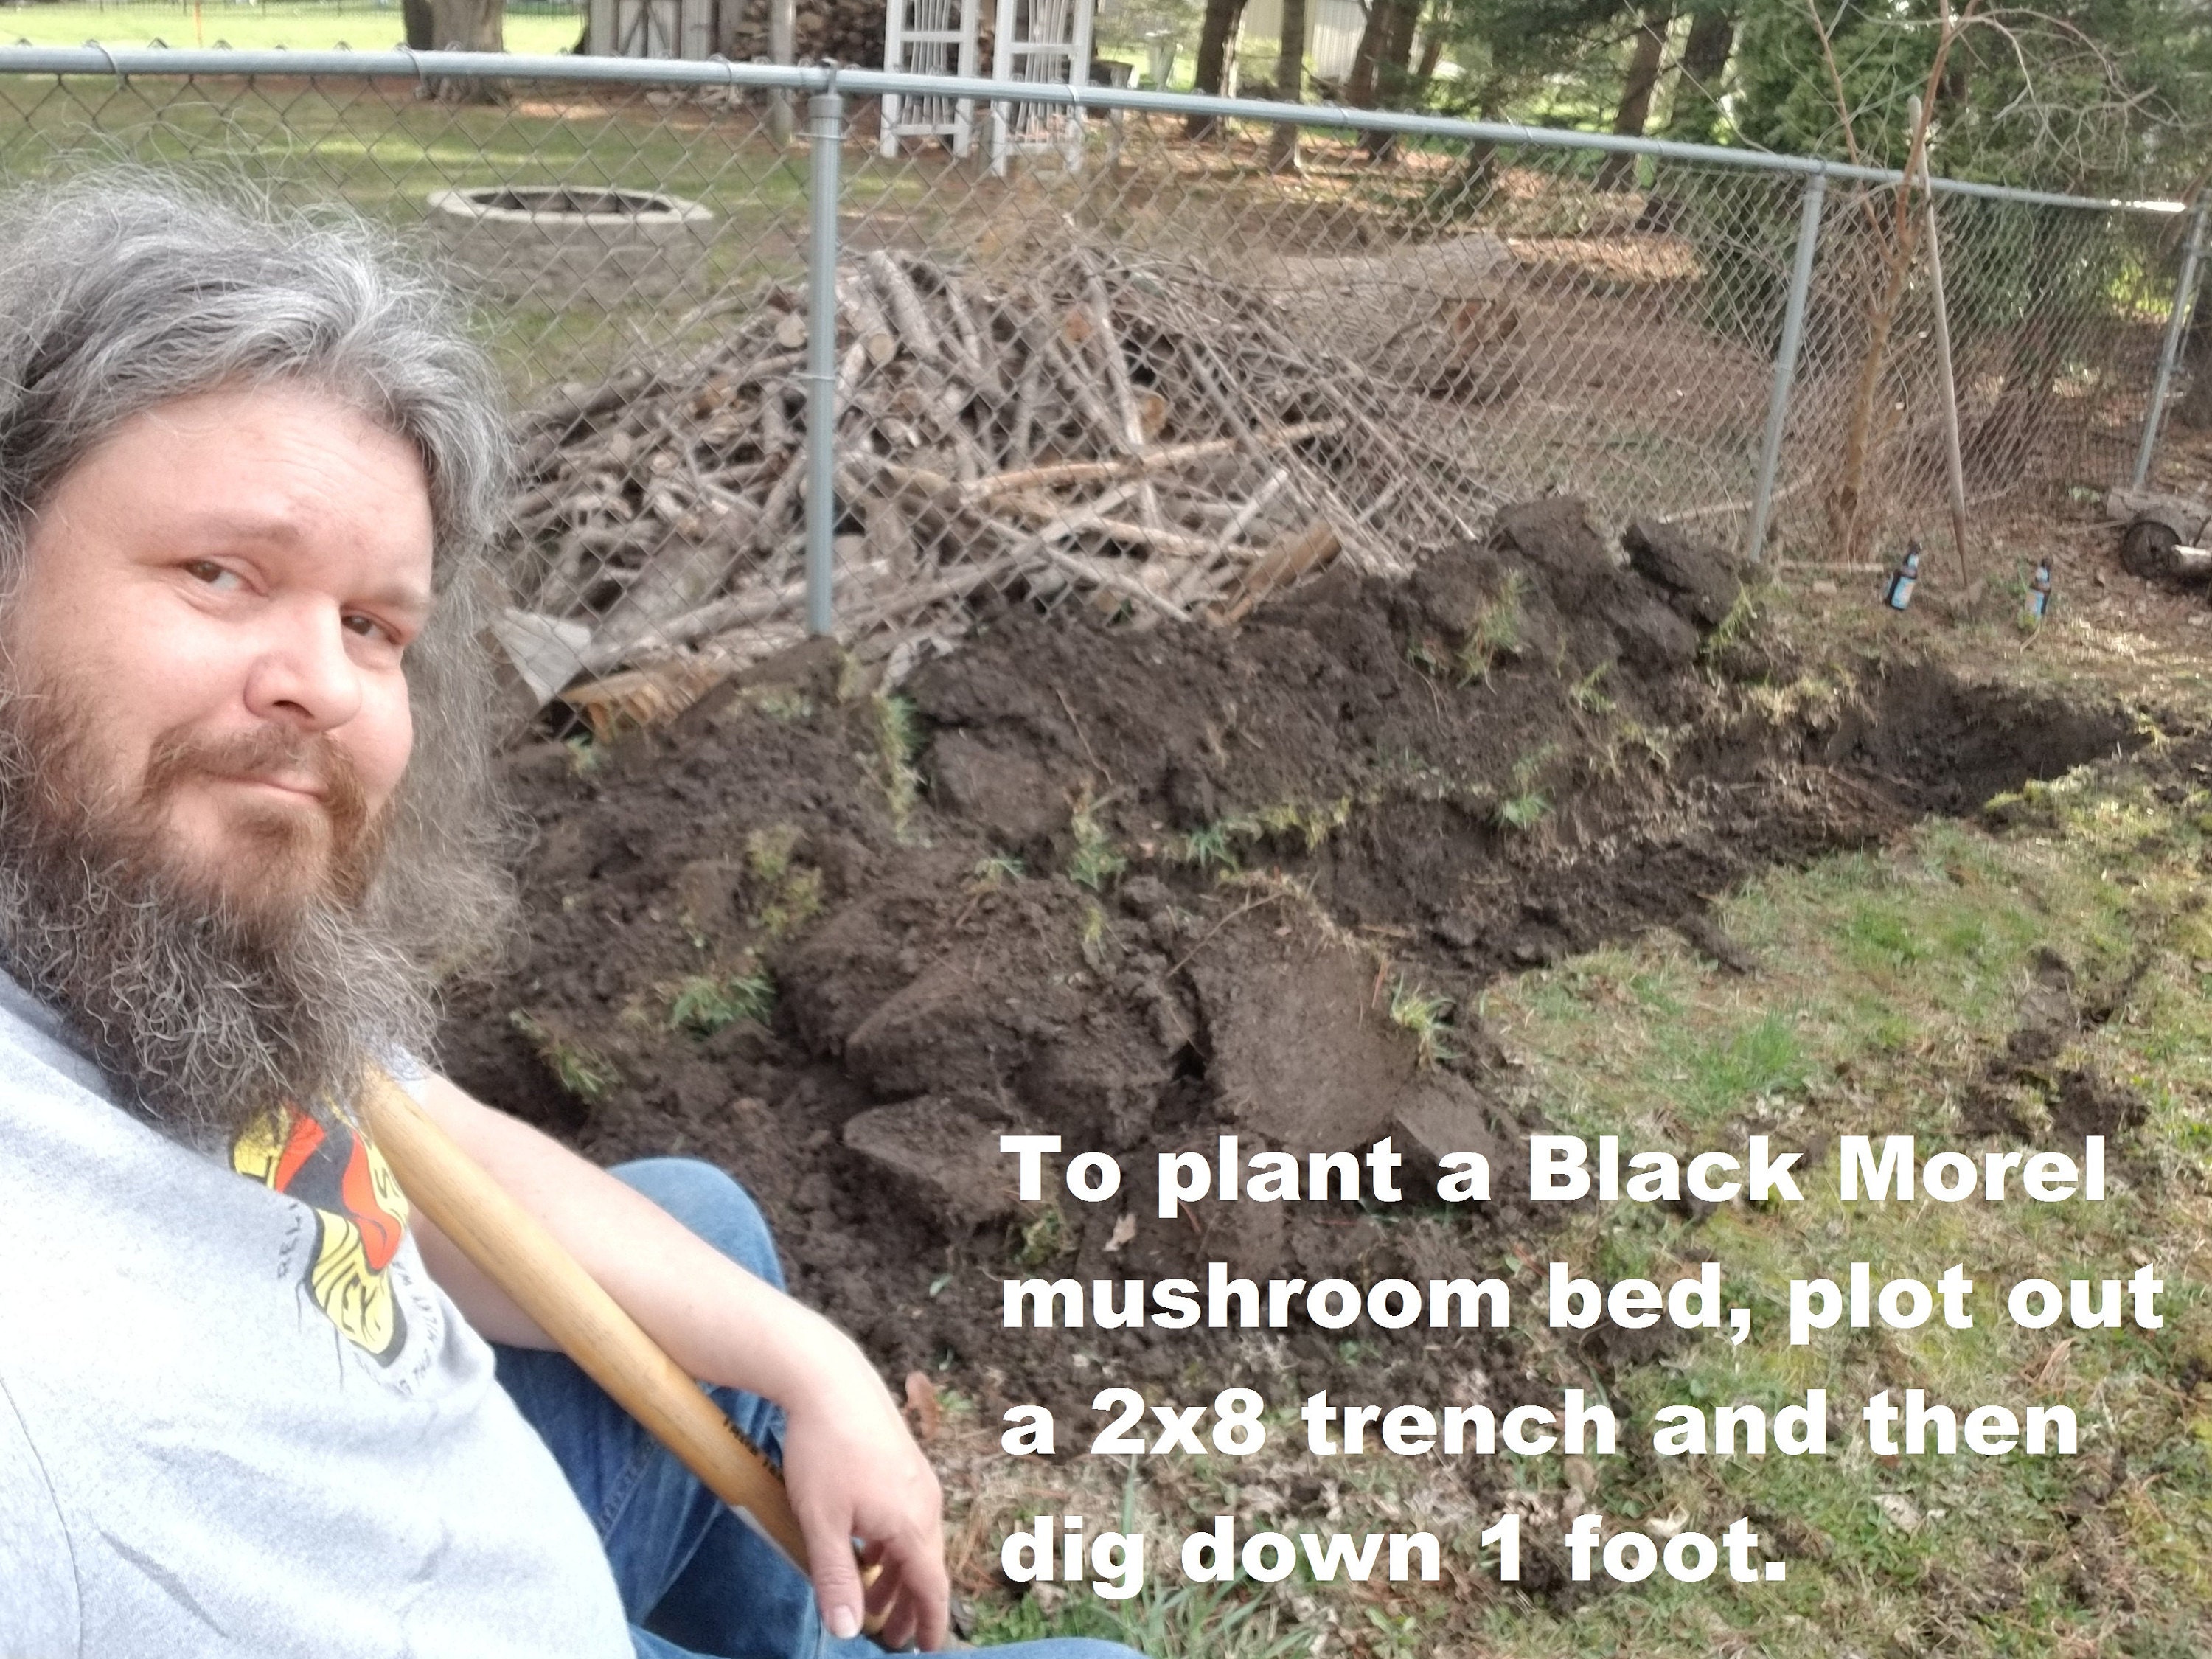
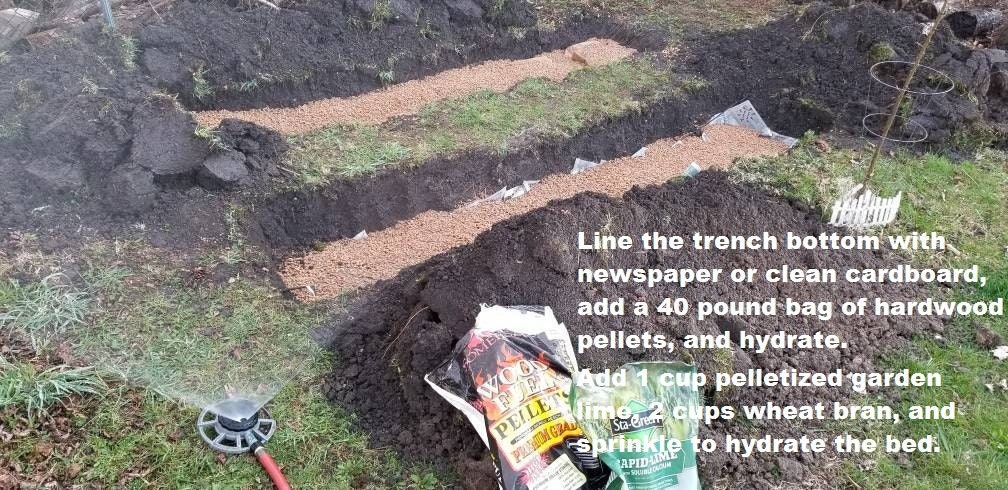
The layered bed method creates a trench that is 8 feet long, 2 feet wide, and 1 foot deep.
Layers of the morel bed, starting from the top down:
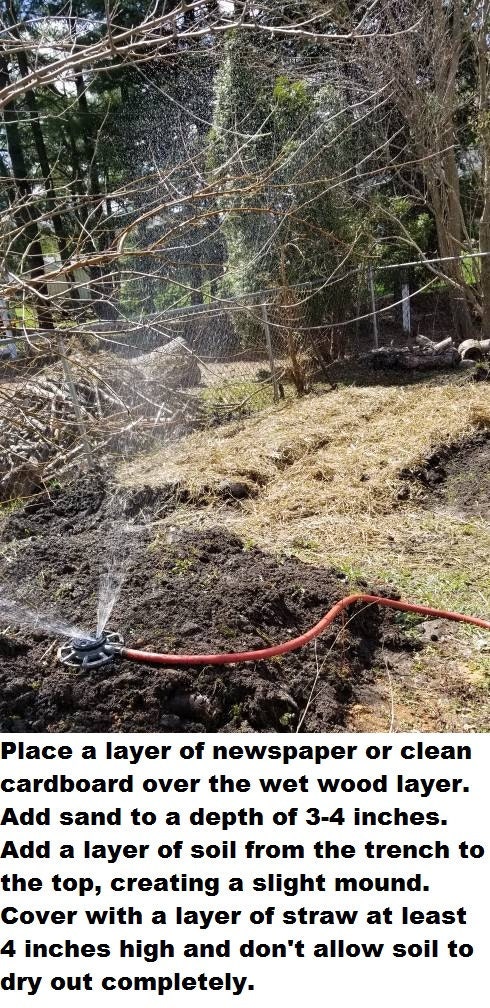
- Thick straw layer (at least 4 inches)
- Morel kit, crumbled on the top of the filled trench
- Layer of native soil from the immediate area
- Layer of paper/cardboard
- Layer of sand (4 inches)
- Layer of paper/cardboard
- Layer of hardwood fuel pellets or clean fresh wood chunks, sawdust, bark with a little wheat bran and garden lime - all hydrated by running a sprinkler overnight
- Layer of paper/cardboard on the bottom of the trench
The theory behind the morel bed construction is that the morel mycelium will grow from the top of the trench downward.
- It grows into the soil layer, becomes acclimated to local microflora, and keeps pushing downward through the paper layer, which allows the fungus to spread horizontally across the bed surface as well.
- It pushes into the sand layer and finds an area free of nutrients. The fungus uses stored energy from the morel spawn, and keeps mining downward, to colonize the next paper layer.
- Below that is the reservoir of wood, supplemented with wheat bran and gypsum. This is the new food source that the morel fungus will colonize.
Morels will fruit generally in response to one or more of the following associated factors:
- It runs out of nutrients. When morel fungus runs out of its food source, it "panics" and sends nutrients up to the surface layer, to become morel sclerotia. These hard lumps of mycelium are a precursor to morel mushrooms. The mushrooms will appear as the morel fungus attempts to escape, to find a new food source to power its growth.
- It hits a wall. When morel fungus is contained by a nearby stone wall, basement foundation, or possibly a piece of plastic lining the trench - this prevents further growth at the layer of the boundary, causing the morel to react by sending up sclerotia, then mushrooms, which in turn produce spores and allow the morel fungus to escape its confines. Don't line the bottom of the trench with plastic, however - the soil must maintain good water drainage properties for success.
- It gets flooded after colonizing the food source. Spring rains or nearby sprinklers can flood the morel fungus, causing it to form sclerotia, then morel mushrooms, as an escape strategy to produce spores. Lots of rain/sprinkling and good soil drainage are necessary for morel success.
- Spring-Summer-Autumn-Winter cycle. The morel seeks to expand its territory each Spring, by sending up morel mushrooms that will in turn produce spores, allowing it to escape the area in hopes of reaching a new suitable food source.
- Fire. Some morel species are triggered to fruit by the presence of burned areas. It is theorized that they may respond to the soil being effectively pasteurized by the heat, and also benefit from the nutrients present in hardwood ash. Many home cultivators incoporate charcoal into their morel beds, but this is optional and not proven to lend success. The two species that I work with, m. rufobrunnea and m. importuna, have not seen cultivation success linked to burn sites.
Chinese morel cultivation methods
Publicly available information, reposted from the SIPO (Chinese patent office, similar to the United States Patent & Trademark Office, but serving China):
Method for using raw material to cultivate morchella
Application Number 201310597665
Application Date 2013.11.24
Publication Number 103583240A
Publication Date 2014.02.19
Priority Information International Classification A01G1/04
Applicant(s) Name HE HAN
Abstract
The invention provides a method for using raw material to cultivate morchella. Specifically, a mushroom house with 30% of sunny areas and 70% of sunless areas can be built on the place where soil properties are loose and moist and water is discharged well; corncobs, bits of wood, bran, chaff, bean flour, plant ash, phosphatic fertilizer, gypsum and sugar are utilized as the raw material; cultivation pits are dug in the mushroom house, two layers of the material are laid in each cultivation pit, two layers of strain are scattered in each cultivation pit, and soil covering is conducted; finally, air humidity in the mushroom house keeps ranging from 85% to 95%, temperature ranges from 5 DEG C to 16 DEG C, and sporocarps can be formed in about one mouth in the environment. By means of the method, the defect that mass commercialization artificial cultivation of the morchella is not achieved so far is overcome effectively. Meanwhile, the produced morchella is cultivated in a wild imitating mode, and therefore entities of the morchella are excellent. In addition, when the method is implemented, the raw material is directly used for cultivation, the production process does not have the procedures of bagging, sterilizing and disinfecting, time and labor are saved, and work efficiency is greatly improved.
Here's another look at a patented method:
Method for cultivating morchella
Application Number 201310129134
Application Date 2013.04.15
Publication Number 103202177A
Publication Date 2013.07.17
Priority Information International Classification A01G1/04
Applicant(s) Name Sichuan Chuanye Food Company Limited
Abstract The invention belongs to the field of morchella cultivation, and particularly relates to a method for cultivating morchella. The method is characterized by comprising steps of firstly, performing field preparation: spacing ridge compartments and ditching; secondly, sowing the morchella and wheat: broadcasting 75-150kg per mu of strains of the morchella on compartment surfaces, covering a soil layer on each compartment surface, applying compound fertilizers after the strains of the morchella are watered, broadcasting 2-5kg per mu of wheat on the compartment surfaces in 1-10 days after the compound fertilizers are applied, covering a sunshade net on the compartment surfaces, and watering the strains of the morchella and the wheat every 2-3 days; thirdly, applying morchella growth promoters: applying the morchella growth promoters in the compartment surfaces in 35-45 days after the wheat is sowed; fourthly, performing fruiting and harvesting field management for the morchella: shading and watering the strains of the morchella and the wheat; and fifthly, performing field management for the wheat: weeding and applying additional fertilizers. The width of each compartment surface ranges from 90cm to 110cm, the width of each ditch ranges from 30cm to 40cm, the depth of each ditch ranges from 20cm to 30cm, and the humidity of each compartment surface keeps within the range from 60% to 80% in the fourth step. The method has the advantages of low cost, high and stable yield, simplicity in operation and easiness in popularization.
Summary
All of these planting methods can be achieved, starting with a colonized morel mushroom grow kit. How you plant it is up to you.
- The simplest method, burying the colonized morel kit 3 inches under the soil, does not inoculate a wide area, but the morel kit is planted with a minimum of physical labor, and the protective layers of soil help to provide dampness and and protection from extreme changes in temperature. Great for areas with lots of hardwood in the soil.
- The spore slurry method provides a greater coverage area, but run a greater risk of drying out the mycelium, with a lower level of physical labor involved. Keep a sprinkler on a timed scheduled, and you can acheive this. Great for areas with lots of hardwood in the soil, requires a lot of rain or sprinkling for success.
- The layered bed method provides hardwood resources where none may previously exist, and will require additional physical labor to create these food sources for the morel fungus. A straw layer provides additional protection against drying out. Great for areas without a lot of natural woody material in the soil.
Any of the above methods may produce for you, and all of them have produced. Your morel grow kit is both a tool and a partner in this process. When you're ready to get started - check out my shop link to select your species (m. importuna or m. rufobrunnea) and get started on YOUR morel mushroom grow.
I'd love to see and share photos of your success, and I'm available to answer questions you may have. Good luck on your grow!